How to Add YouTube Video in blogger


How to Add YouTube Video in blogger.


Blogger provide video upload for any blog post but what if you want to use some YouTube video. Directly you cannot do it but it doesn’t mean blogger does not support it. There is a simple tweak for this thing and you can do it very easily as 1, 2 and 3...

Here is the process in steps.

1. First open your desired video in YouTube

2. Now copy the code embedded video for webpage (highlighted in image)

3. Now open the blogger and edit or create a new post.

4. Decide where you want to show the video for example I have decide a line as in below screen shot.

5. Now click on Edit HTML तब


6. You will get a screen like this

7 Paste your copied embedded code just after your desired line or your desired location.

8 Now click on compose link and it will show you a place for video.

9 You can click on preview to see if this video is properly entered in your blog post or not before publishing it।


Here is an example for this


Hope it was useful for you

Thanks for being here

Read More......

Multiple IP on single LAN card

Multiple IP on single LAN card


Yesterday I was taking an interview and I asked a simple question that how many IPs can be there on a single lan card and I was amazed because that guy answered me only one. In fact he was very good in network and hardware knowledge but then also he was not knowing this answer so I decide to right it on my blog that how many IP can be there on one LAN card and how to do that in windows machine.


On a single LAN card we can give 1024 IP yes 1024 IP it’s a different thing that we are not going to do it ever in normal case. What about limitation of Windows machine? In fact I also do not know about windows Maximum IP limitation but I have tested it with 32 IP on a windows Vista machine and it worked fine for all 32 IP on that machine.


Ok now let’s see how we can give more than one IP on a single machine


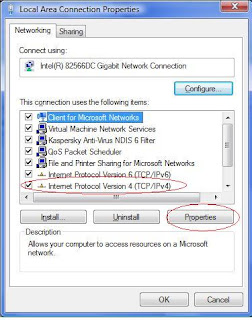
First open properties of your lan card select Internet protocol version and then click on properties button.


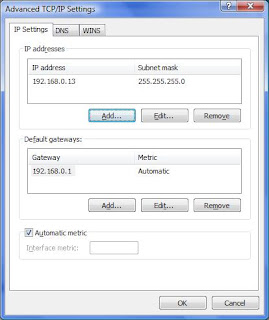
It will open you another window where you give your single IP. For providing one more additional IP what you need to do is just click on the advanced button and it will open one more window is advanced TCP/IP settings.


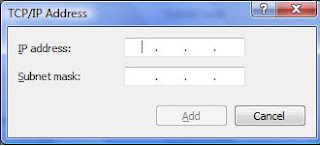
Here click on add and it will give one more prompt windows with heading TCP/IP address. In this window you can give additional IP and subnet mask ID.


You can give as much IP as you need to give by the same way.


Ok we gave multiple IP but what about the multiple Default gateways.


So for giving additional default gateways go to advanced TCP/IP setting again and this time click on the add button of Default gateways option


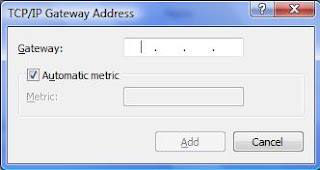
it will open a window named TCP/IP gateways address just give you default gateways address here and click on add you are done with this.


Needless to say you can give multiple default gateway in the same way.


OK now we are done with IP and gateways what about multiple DNS address on a single LAN card.

By default you can give 2 DNS address without any additional click but what if you need to give more than 2 DNS address then what to do?


Answer is simple just go to TCP/IP settings window again and click on DNS tabthan click on Add button.


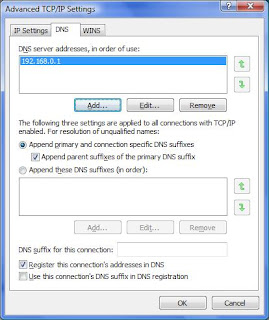
It will open a TCP/IP DNS server window


just give your DNS server IP here and here you are done with this also.


Here you can prioritise your DNS server IP as per your requirement by appending them


Do contact me if you get any problem


I hope it was useful for you and you liked it


Thanks for visiting my blog.

Read More......

Complete backup solution single tool

Complete backup solution by a single tool

I gave simple backup script in my previous post that could copy the data at backup location and it could zip it and rename it with current date but what if you want to have an incremental data backup or what if you want to copy something on your ftp server religiously for keeping something more secured. This time I am here with a solution that can not only backup or upload data but can do many other tasks also.


This is simple light weight software that can do Backup, Restore of backup, FTP Mirroring, uploading data on FTP, Download and copy the data from local computer as well as from network too. You can decide the time and priority for any task and you can schedule it.


The best thing with this tool is that you can back up the data not only on local machine but also on ftp as well as on DVD also.


If you need it you can download if from here for free.


I am using a downloaded version and I have no issue in using it.


I hope it was useful for you

Read More......

Firefox is already running, but not responding

Firefox is already running, but not responding in Linux


Firefox is already running, but is not responding. To open a new window, you must first close the existing Firefox process, or restart your system.


It was the error message on my fedora 7 machine that had Firefox 2 installed. I was able to launch Firefox in my root user account but I was not able to do so in my non root user account.


I am not Linux expert but I always believe you can search any solution as long as you know what you need to search so I just goggled for this and got the solution and cause of problem too.


Cause of the problem is a bug that is in Firefox since version 1.5 and its solution is simple delete the old profile and creates a new one. Here is the complete process in steps.


1) Login as non root user.

2) Press alt+f2 it will give you a small window.

3) In text field of this windows type Firefox –p

4) It will open Firefox profile window.

5) Delete or rename the existing all profiles.

6) Create a new profile and make it default.

7) Start you Firefox and here you go. It’s should work fine now.


I got this problem in Linux (Fedora) but doesn’t matter if you have same problem in windows solution is same in windows also for this problem


If you are in windows for step 2 instead of alt+2 please user windows key+r and rest all the process is same.


Do let me know if you face any issue in this.


Hope it was useful for you.


Thanks for visiting my blog

Read More......

NTOSKernel.exe file is missing

NTOSKernel.exe file is missing or corrupt
NTOSKrnl.exe file is missing

Yesterday one of my colleagues came to me and said her machine got crashed and it’s not booting. It was an XP machine and before coming to me the guy who assists me for my work already tried it booting in safe mode or last known good configuration mode but nothing was working.

Please remember my suggested solution is useful for you if you have two windows XP machine.

My assistance asked me if we should go for rebuild of this machine. My straight answer was no because I wanted to see if we can have other option.

First I checked machine and In next step I asked my assistance to do a simple trick. We copied ntoskernel.exe file from some other computer’s \windows\system32 folder and we pasted that ntoskernel.exe file in damaged machine’s \windows\system32 folder. For this task we made the crashed machine hard disk as secondary hard disk .

Here is the complete procedure for this.
1) Take out the crashed windows XP machine hard disk
2) Make it secondary hard disk in your another Windows XP machine.
3) Copy ntoskernel.exe file in secondry harddisk rootdrive:\windows\system32 folder from your rootdrive:\windows\system32 folder.
4) Remove secondary hard disk and attach it in its original machine.
5) Try to boot your computer now. It should get booted without any issue.

Do remember both the windows XP version should be same. There are other options also but those are not this much user friendly and if you do not have two computers why don’t you visit your friends place for a cup of coffee with your hard disk.

Hope I am clear here ;)

Please let me know if you face any issue in this.

Thanks for visiting my blog and I hope it’s useful for you.

Read More......

SQL server management Studio not avilable

SQL server management Studio Installation problem

Some time I get a very silly error after installation of SQL server 2005 on few development computer, When I install SQL server 2005 I do select all client component or workstation component for SQL server 2005 but surprisingly when I complete the installation I do not get the SQL server management studio many time. When I try to re-install SQL Server Management studio it says Its already installed and there is nothing to install.

For get rid this problem I tried to install SQL server Management studio from tools folder of my installation CD but same message that its already installed and there is nothing to install. Then I decided the other way. First I uninstalled SQL server workstation component and then I re-installed those components from tools folder of Installation CD and It worked great.

Here is the procedure for solution of this problem
· Open your add remove program (shortcut from run is appwiz.cpl).
· Select Microsoft SQL server 2005 and click on remove button it will open you a screen like this.


· Deselect Remove SQL server 2005 Component and select Workstation component as suggest in image above.
· Now click on next and after that it will un-install SQL server 2005 workstation component.
· Now restart your computer.
· Go to tools folder of you SQL server 2005 CD.
· Open setup.exe it will ask you for acceptance of policy and then it will collect data for installation.
· After that you will get the bellow screen here select entire feature will be install on local hard drive for client component and for document and samples.

· Once selected this click on next and once installation is done you are done with it
· Check SQL server Management studio and enjoy it.

Hope Its clear and usefull for you

Thanks for being here

Read More......

VS.net 2003 on Vista

Dot.Net Framework 1.1 on Vista

When I tried to upgrade all the computer of my office from older windows XP sp2 or Windows XP SP3 then I got objection from couple of team members as Vista does not support .net framework 1.1 so they cannot install VS.net 2003 and they have some projects that need VS.net 2003.

After a little search I got to know that we need to install dot net framework 1.1 and its service pack before install but problem is vista do not support .net framework 1.1 without sp1 and MS website do not give combined pack of dot net framework with sp1. For avoid this issue I did search again and I got to know the method of creating a combined folder of dot.net framework1.1 and sp1 files. I may share the method to you in any of my future post as it’s a long procedure for same post.

I have uploaded this folder on rapidshare and you can download this from here
http://rapidshare.com/files/152916258/Dotnetframework1.1_with_SP1.zip
Method for installing VS.net 2003 is here
1) First download the dot.net framework1.1 with sp1 zip file from here or above given location.
2) Extract the zip file.
3) After extraction you will get 2 folder Program Files & Win and 2 files netfx.msi & netfxsp.msp double click on netfx.msi.
4) It will install dot.net frame work 1.1 on your vista computer. It will not give any alert or message for completion, it will just close the installation window after completion of installation of dot.net framework 1.1
5) Now install VS.net 2003 as you do for your XP Machine.
6) At the time of setup start it might give you a message that front page server extension 2002 is not installed you can skip this alert.
7) After this just follow the entire step that you always do for installing VS.net 2003 on your Windows XP computer. It shall not give you any issue.
8) While installation will complete it will give you an alert that this version of vs.net 203 is incompatible with Vista for using this just avoid this information and use it as administrator.


Do let me know if you find any issue in this by comments. Please do mention your mail ID while commenting for any issue or need support so I can get back to you.

Let me clear you one thing that I am not dot.net expert I am only a system admin who works with system.

Hope It was useful for you

Thanks for visiting my blog

Have a nice time

Read More......

Yahoo Messenger 9 offline installation

Yesterday someone mailed me for asking an offline installation of Yahoo messenger 9.0 because he want to install the yahoo messenger 9 on multiple computer and for saving his bandwidth he do not want to install it via internet all the time.

I installed yahoo messenger 9 on my computer and before installation I extracted its complete downloaded setup in my other directory from temp directory and it’s done.

I don’t have any direct link for yahoo messenger 9 offline setup from yahoo’s website, but I have uploaded its exe on rapidshare in compress zip file if you need an ofline installation you can download it from here.

http://rapidshare.com/files/152282399/yahoomessenger9.zip


If you have some trouble in downloading file from rapidshare let me know where I should upload it I will upload it.

Thanks for visiting my blog

I hope it was useful for you

Read More......
Clicky Web Analytics